

It was the best of times, it was the worst of times … Don’t worry, I’m not about to get all Dickensian on you; I’m simply referring to how I felt during my Flair Espresso Maker review.
As it happens, I’ve been wanting to play around with this manual lever espresso machine for quite some time, and I recently ordered one to test out. Hence, this Flair Espresso Maker review.
Still, before I go any further, you should know that this machine isn’t for everyone. Seriously, there were some tense moments during my testing when I just wanted to quit. However, at the end of the day I was pulling some of the best espresso I’ve ever tasted in the Coffeeness kitchen.
I can tell you one thing for certain: It was one heck of a rollercoaster ride!
Makes sublime espresso
Flair Classic Espresso Maker
Time and patience required
Affordable espresso machine
Can produce exceptional results
Clever design
Lightweight and portable
Great fun for espresso nerds!
Steep learning curve
Lots of small parts
| Flair Classic Espresso Maker | |
| Manufacturer | Flair Espresso |
|---|---|
| Model number | Classic |
| Product category | Manual espresso machine |
| Housing material | Stainless steel with plastic parts |
| Color options | Black |
| Milk frother | None |
| User interface | None |
| App | |
| User profiles | Memo function only |
| Portafilter size | 40 mm |
| Tamping | Manual |
| Removable water reservoir | |
| Water reservoir capacity | N/A |
| Number of boilers | 1 |
| Pump pressure | 9 bar |
| Maximum cup height | 5.0 in / 12.7 cm |
| Grinder | N/A |
| Grind adjustment levels | N/A |
| Bean hopper capacity | N/A |
| Specialty drinks | 0 |
| Pre-infusion | |
| Adjustable coffee temperature | |
| Adjustable milk foam temperature | |
| 2-cup function | No |
| Hot water function | |
| Hot milk function | |
| Milk foam only option | |
| Water filter | |
| Power consumption | N/A |
| Weight | 5.0 lb / 2.3 kg |
| Dimensions | 10.0 x 6.0 x 12.0 in |
| Warranty | 5 years |
| Notes | Included Accessories: User manual, Bottomless portafilter, Dosing cup/tamper, Carrying case. Optional Upgrades: Pressure kit with gauge and stainless steel tamper. |
| Current price on Amazon | BUY NOW ON AMAZON |
| All specifications | |
Table of Contents
Flair Espresso Maker Review Overview

Coffeeness Medium Roast Espresso
Well-balanced with chocolate & hazelnut notes
Freshly roasted in Brooklyn
Very low acidity
The original Flair Espresso Maker caused quite a stir in the specialty coffee world upon its release in 2016. Suddenly, we had an affordable manual lever machine that looked great and could produce outstanding results.
While the manufacturer has since launched more and more innovative manual espresso makers, the original machine’s elegant design remains pretty much the same.
When I tested the Flair Espresso Maker, it didn’t include a pressure gauge and I had to shell out extra money to get one. However, these days, the Flair Classic always comes with the pressure kit and costs $N/A. That’s a really good thing, because I can’t imagine using the Flair without that gauge.
Besides, you won’t find anything in my home espresso machine guide that produces such exceptional results for such a reasonable investment.
As you already know, my Flair Espresso Maker review was both frustrating and rewarding. I can tell you that getting to grips with the thing (and even decoding the limited user manual) takes time and patience. Lots of patience.
Plus, there’s no milk frother to talk about, so if you were hoping for a cappuccino maker you’re out of luck.
However, once I got the hang of the Flair Classic espresso machine, I quickly began to realize what all the fuss was about. Ultimately, this manual lever machine is ideally suited to those who already geek out over espresso and want a new toy to play with.
That’s not to say adventurous beginners shouldn’t give the Flair a whirl – you just have to know what you’re getting into. Ultimately, the Flair Classic has been designed for those who love ristretto shots of espresso, because that’s all you can make.
Other Flair Espresso Makers
As I mentioned above, the manufacturer has continued to innovate, and there are quite a few Flair models to choose from now. Other than the Classic, here’s what’s on offer:
Flair The NEO Flex – the most affordable Flair, with pressurized portafilter and plastic base
Flair PRO 3 – larger capacity portafilter, pressure gauge and silicone lever grip
Flair 58 – expensive, professional grade machine with 58mm portafilter
Flair 58 Plus – top-of-the-line espresso maker with tons of extras and a detachable electric preheat controller
I’m sure you won’t be surprised to learn that Flair offers plenty of accessories for its espresso makers. So, if you’ve bought the original and want to upgrade, you can pick up the pressure gauge for $56.00.
The manufacturer also sells a hand grinder called the Royal Coffee Grinder for $159.00. I haven’t tested it out, so I can’t pass judgment. Still, you absolutely will need an espresso-capable burr coffee grinder to use the Flair Classic, and hand grinders often give you more bang for your buck.
Check out my guide to the best manual coffee grinders for inspiration!
Flair Espresso Maker Features
Size and Design
Reviewers gush to the max about the Flair Espresso manual espresso maker’s stylish good looks and minimalist design. I won’t bombard you with a bunch of adjectives, suffice to say the Flair Classic is going to add a sense of elegance and refinement to your kitchen.
In fact, I’d say you’ll want to keep this thing out on your counter rather than store it when it’s not in use.
Featuring a forged aluminum base and solid, weighty stainless steel parts, the Flair Classic is certainly well-built. Even so, the espresso maker felt a little wobbly to me once I’d put it together. That said, you are able to permanently attach the lever to the base, which adds a lot of stability.
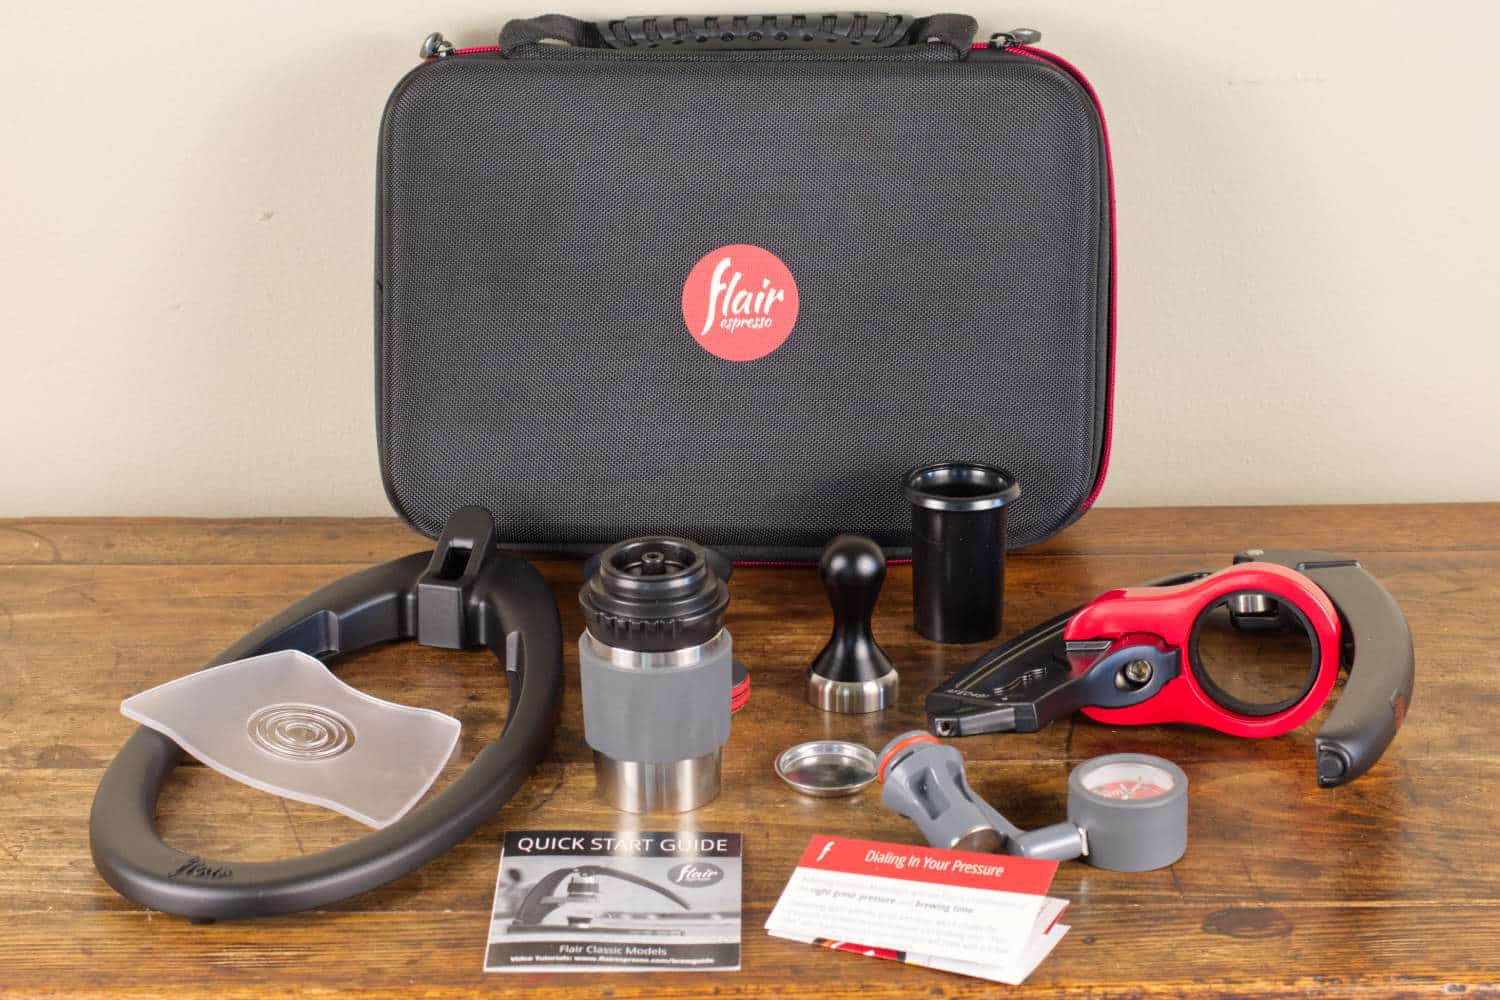
On the flip side, part of the Flair’s appeal is its portability – the whole thing can be taken apart and weighs just 5 pounds (2.3 kilograms). Plus, it comes with an awesome padded travel case. That’s all well and good, but there are lots of parts, some quite small and fiddly. Let’s just say I wouldn’t trust myself not to lose a crucial component along the way!
Overall, though, the Flair Classic is really well-designed and feels like it’ll last for a very long time.
Detachable Brewing Chamber
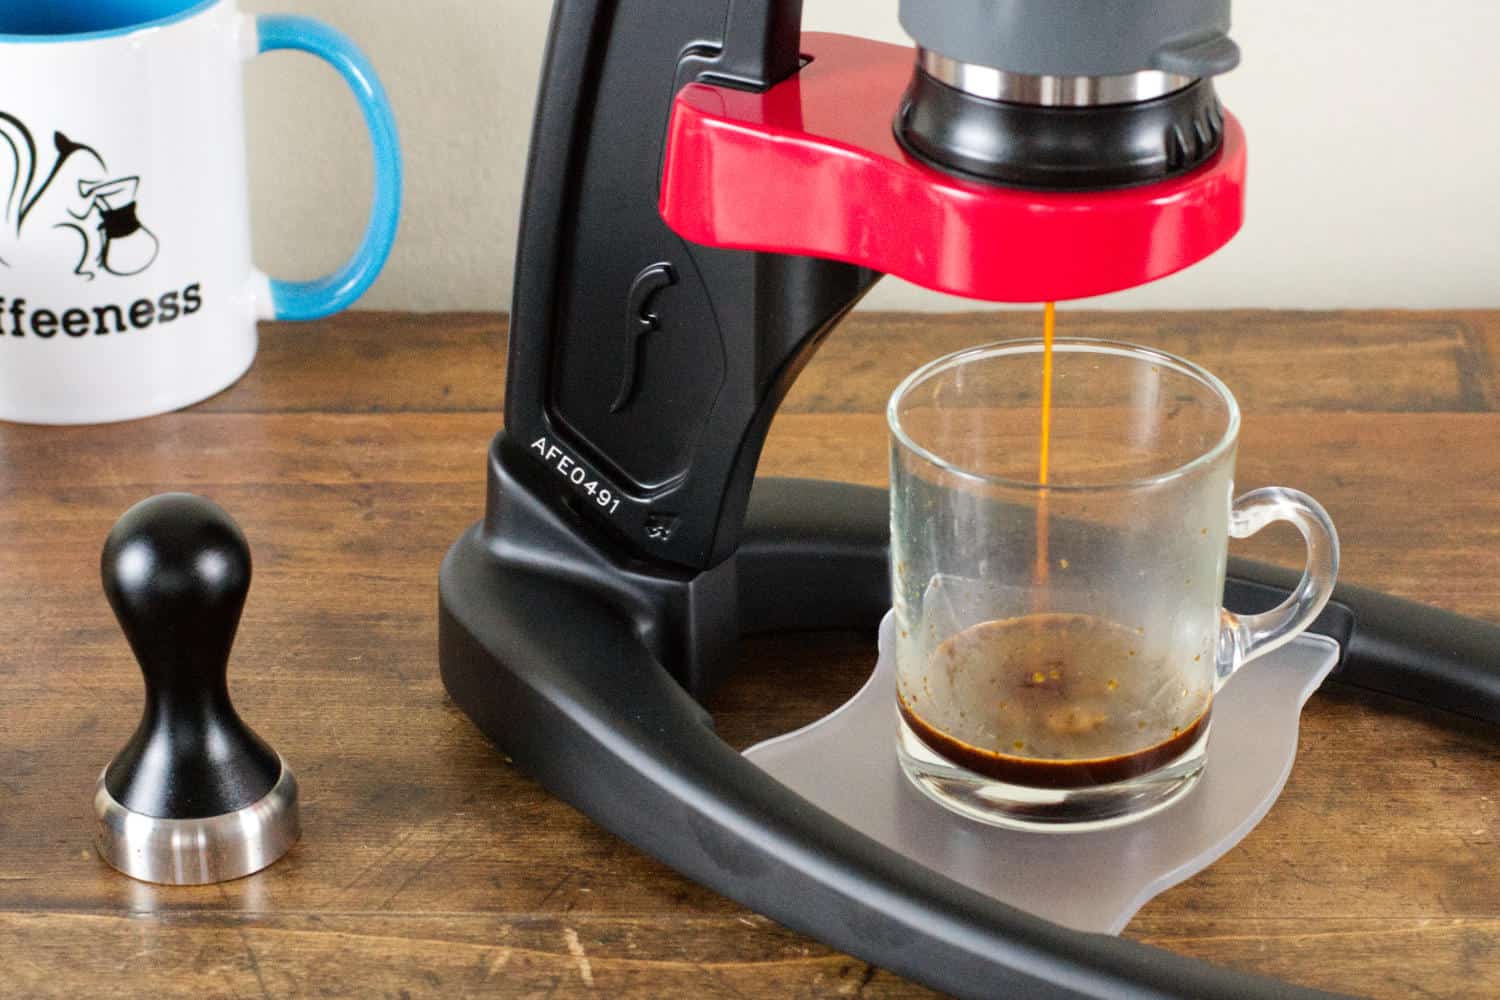
The true genius of the Flair Classic Espresso Maker’s design becomes apparent when you consider its removable brewing chamber. This is the heart of the espresso maker and it’s where all the magic happens.
There are a few components involved here. For starters, there’s the portafilter, which sits just above your espresso cup. A shower screen sits on top, followed by a stainless steel brewing cylinder, which attaches snugly to the portafilter.
Lastly, there’s the all-important piston, which forces water through the bed of ground coffee as you depress the lever.
Sounds pretty fiddly and complicated right?
At first, I’ll admit that I struggled to work out what goes where. Plus, I couldn’t figure out which piece was the piston. My temperature rose and rose, and I was almost at breaking point when I realized the piston was jammed into the cylinder. And it was far from easy to remove.
Still, once I’d passed that particular test of my patience, my Flair Espresso Maker review progressed more smoothly!
Incidentally, the 2-in-1 portafilter holds up to 16 grams of coffee grounds and the brewing chamber has a 2-ounce (60-milliliter) capacity. So, given that coffee grounds absorb water during extraction, you can expect a maximum output volume of around 1.5 ounces (45 milliliters).
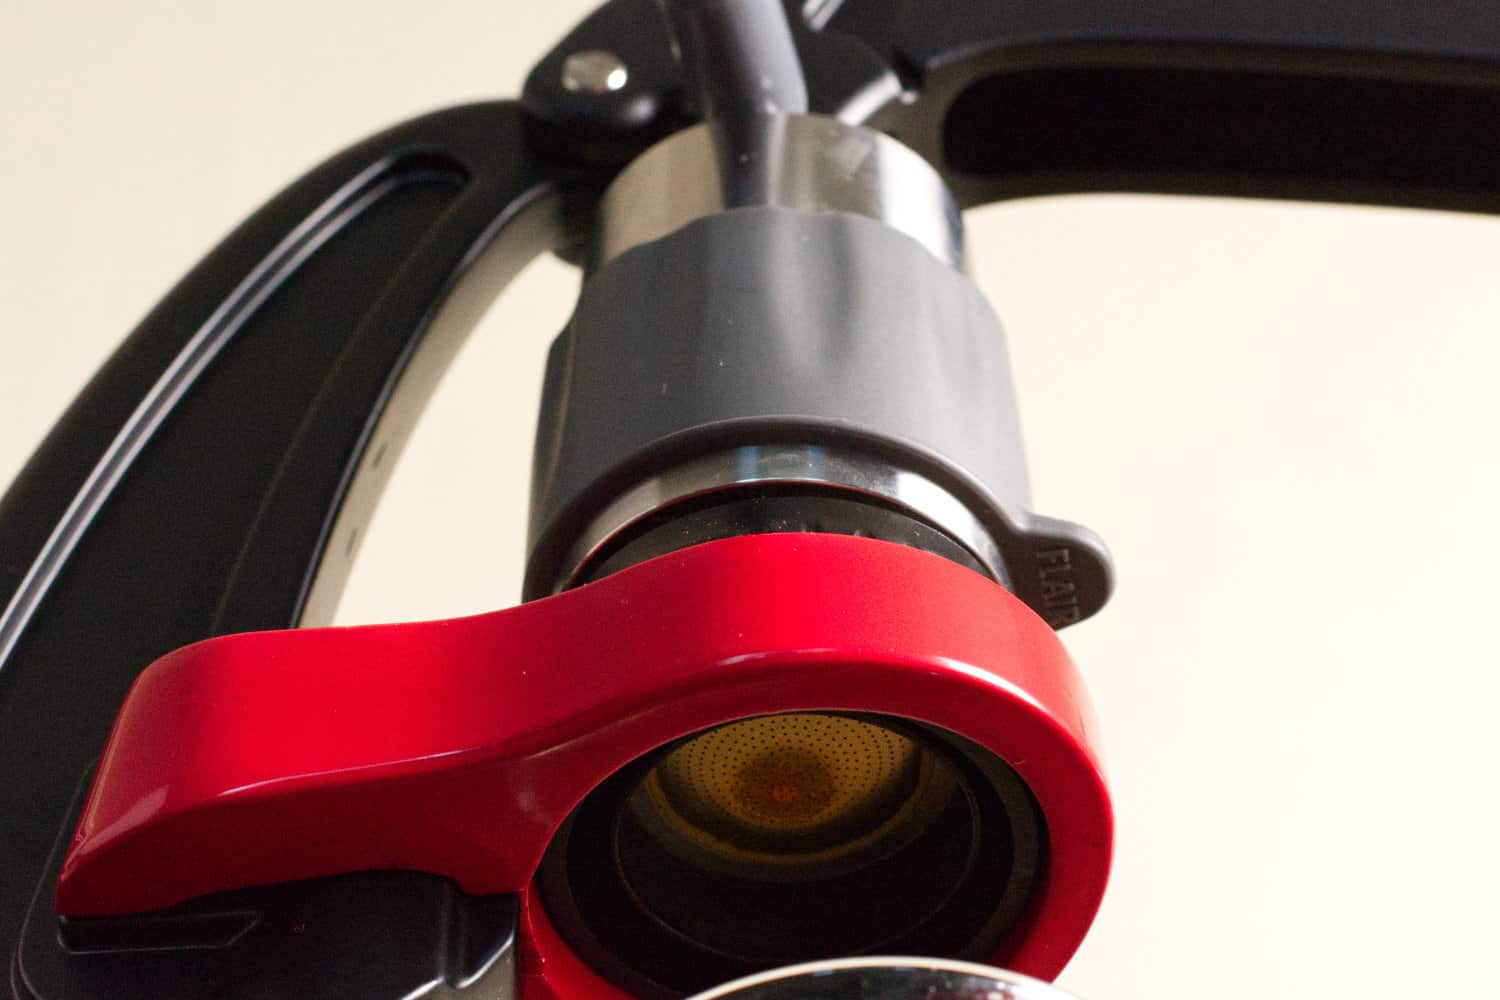
Pressure Gauge
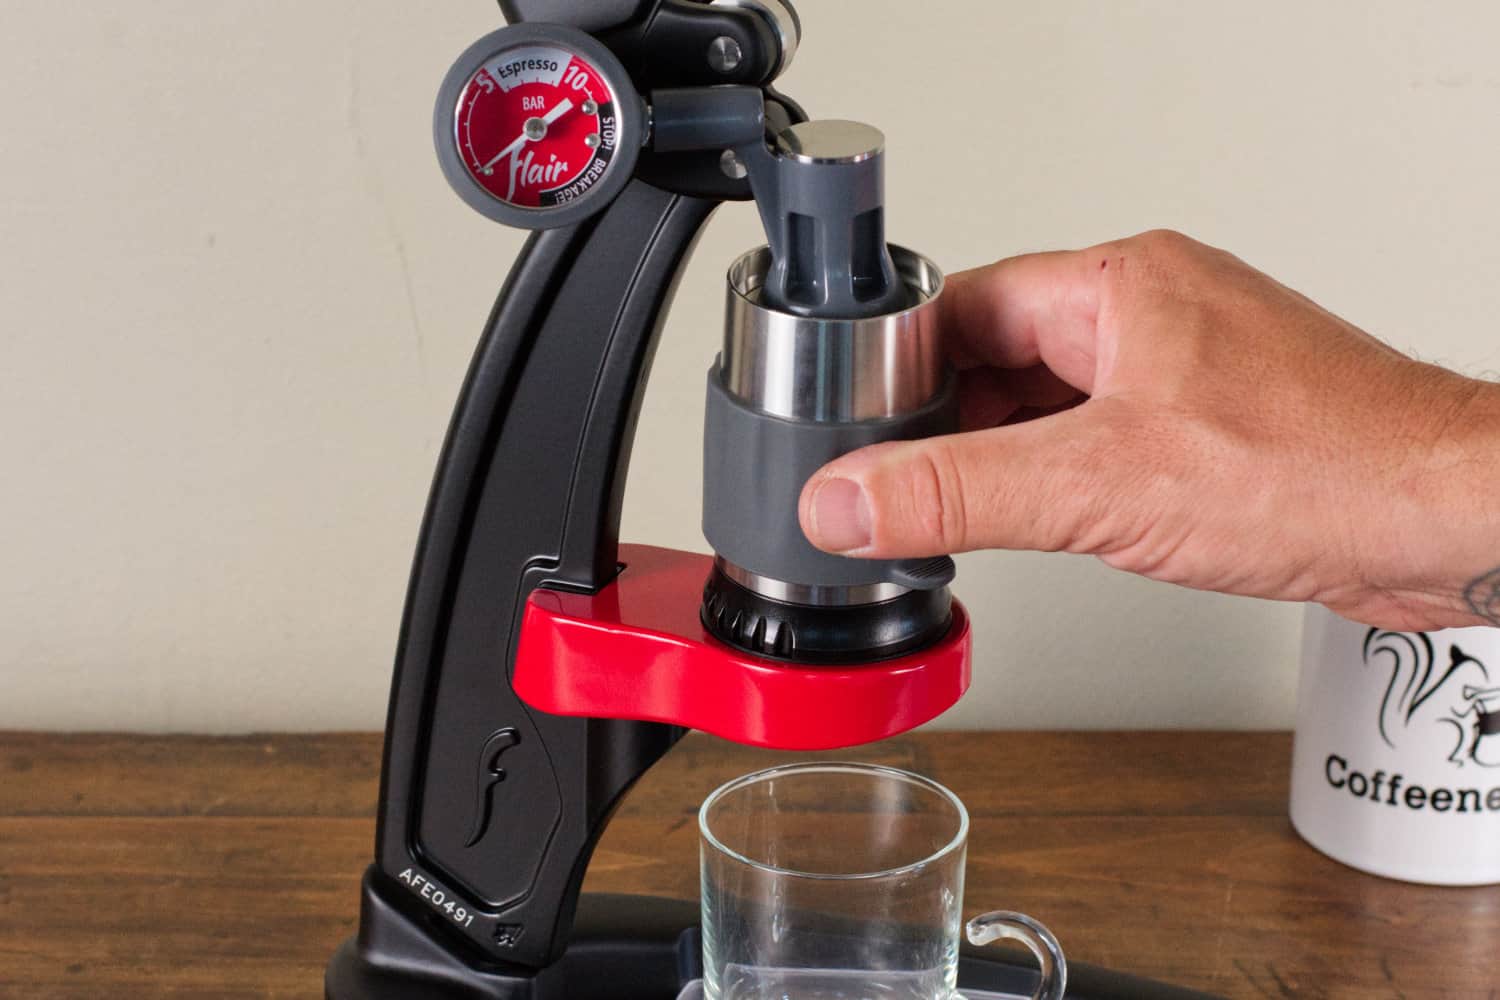
As I already mentioned, I can’t imagine using the Flair Espresso Maker without the optional pressure gauge. After all, we’re talking about a manual-lever machine here, so you’re relying on your own muscle power for extraction.
And given that most of us can’t precisely monitor how much pressure we’re exerting when pressing down, it’s really handy to have a gauge to show you. Moreover, it frees you up to experiment with pre-infusion and pressure profiling while taking notes along the way.
As you’ve probably guessed, the pressure gauge is perfectly designed and fits seamlessly into the Flair’s brewing process. There’s an included plunger that sits in the brewing cylinder, and once the gauge is placed on top it acts as the piston.
Sure, it means you’ve got (even) more parts to deal with, but it’s totally worth the extra hassle!
Tamper
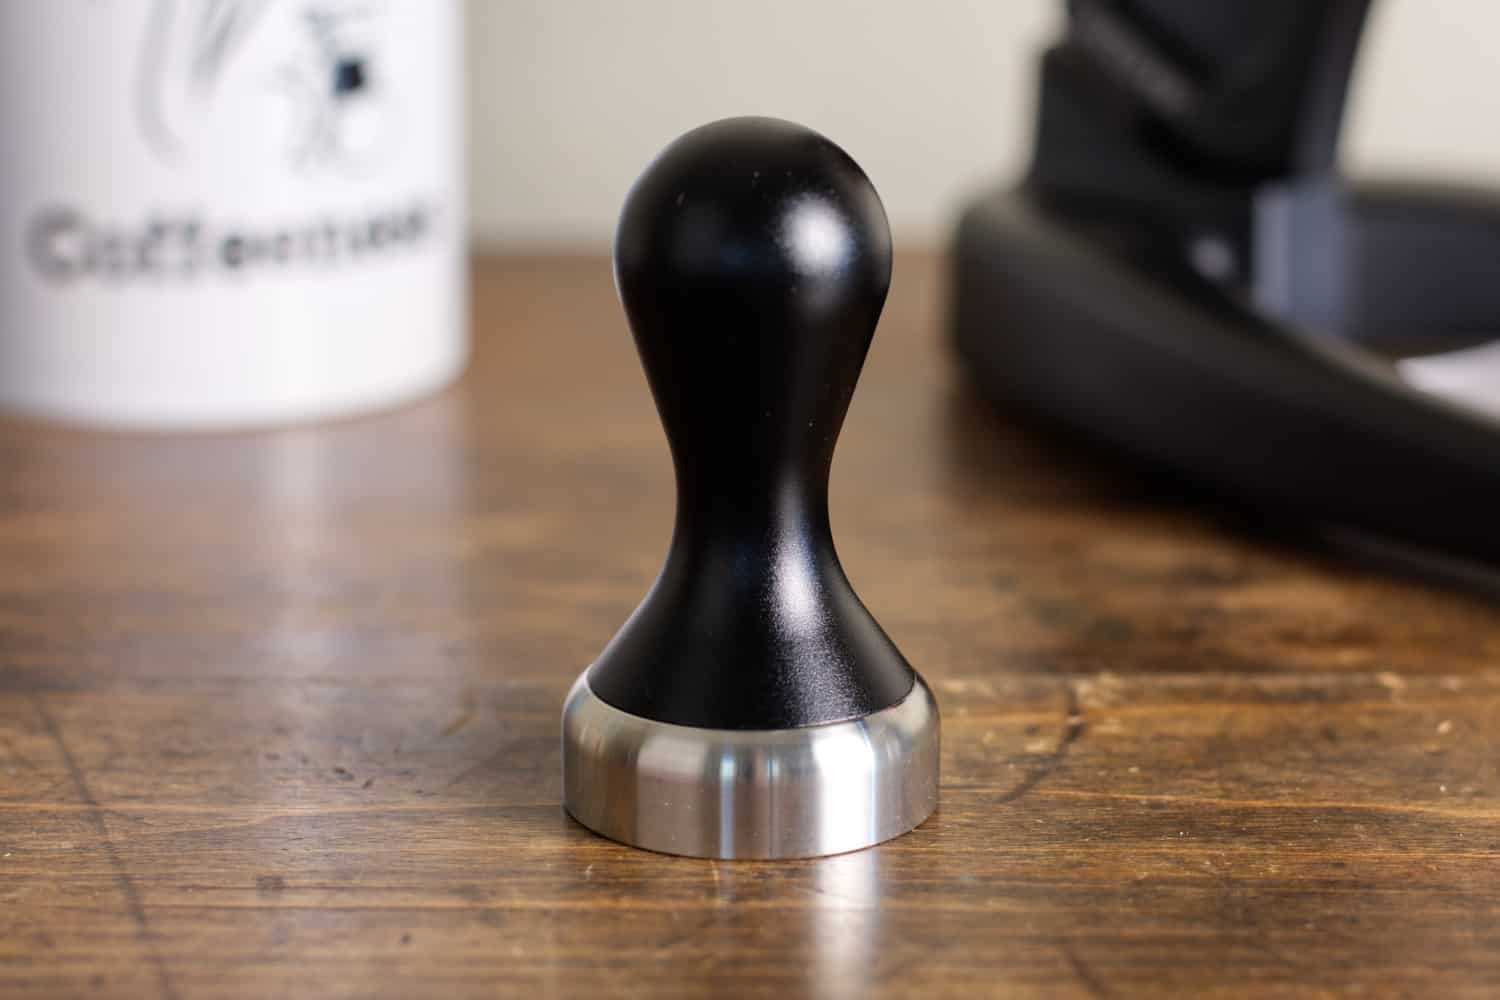
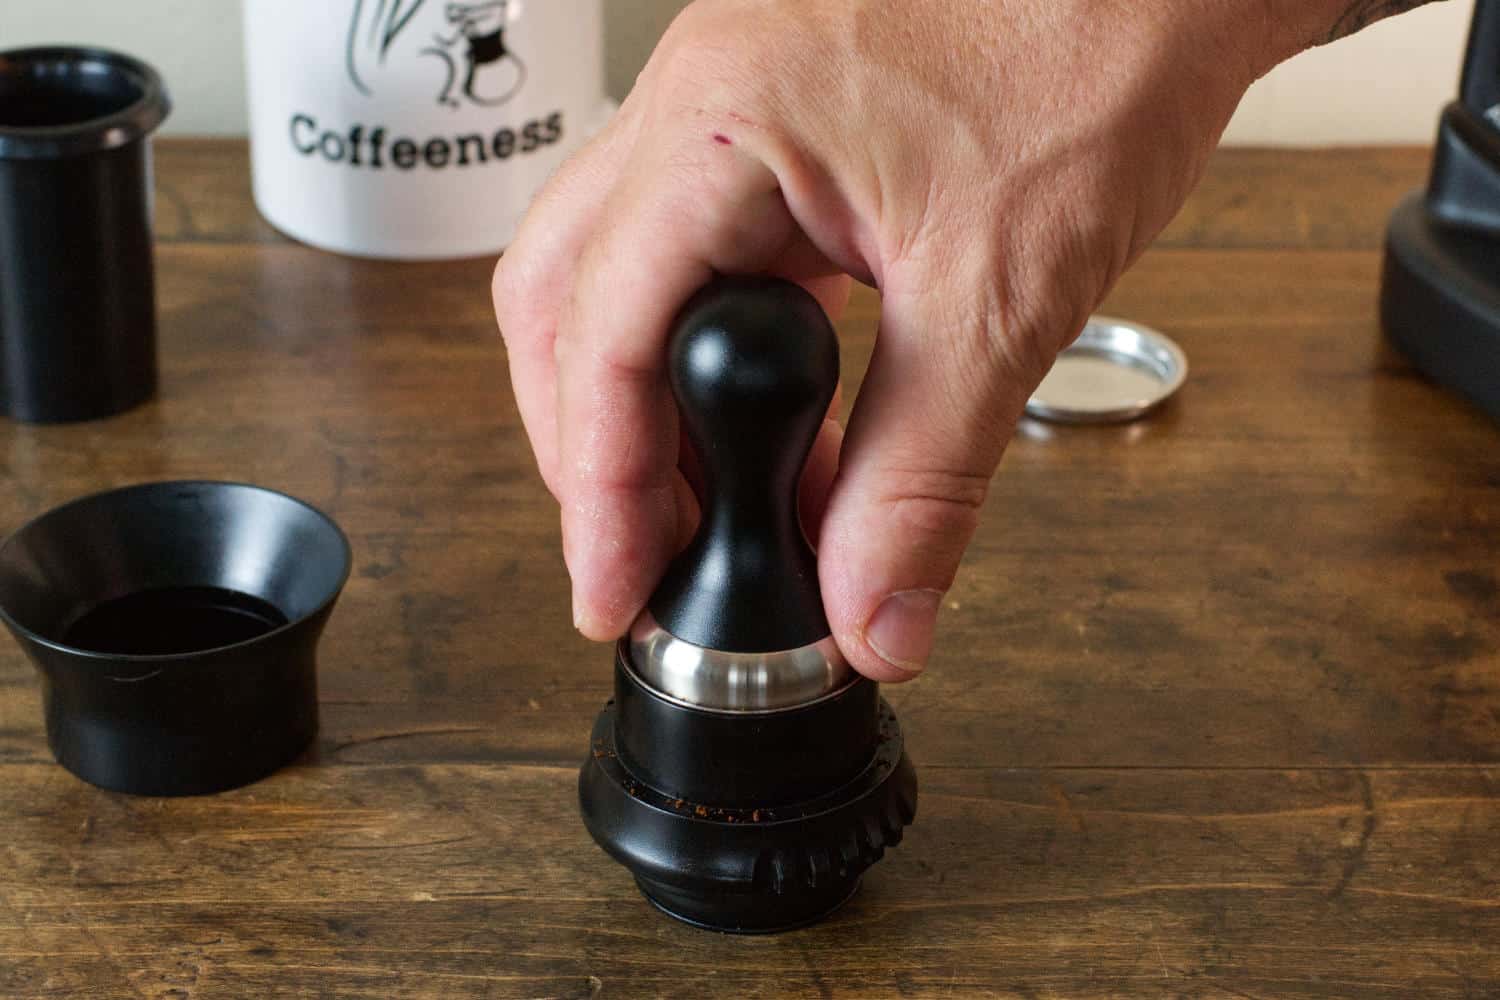
Aside from the aforementioned gauge, an advantage to spending a little more on the Flair Classic with Pressure Kit is the upgraded espresso tamper.
I have to say this is the cutest tamper I’ve ever seen. However, don’t be deceived by its diminutive appearance – this thing works really well.
As it happens, the Flair Classic’s portafilter is quite odd in that it has a small diameter while being deep enough to hold 16 grams of coffee. With that in mind, I found that effective tamping was of the utmost importance. In other words, maintaining a level surface and applying sufficient pressure to create resistance in the puck.
Enter the Flair tamper, which is heavier than it looks. What’s more, it has a solid metal base and really nice weight distribution. Long story short, the upgraded tamper gets my full approval!
Dosing Cup
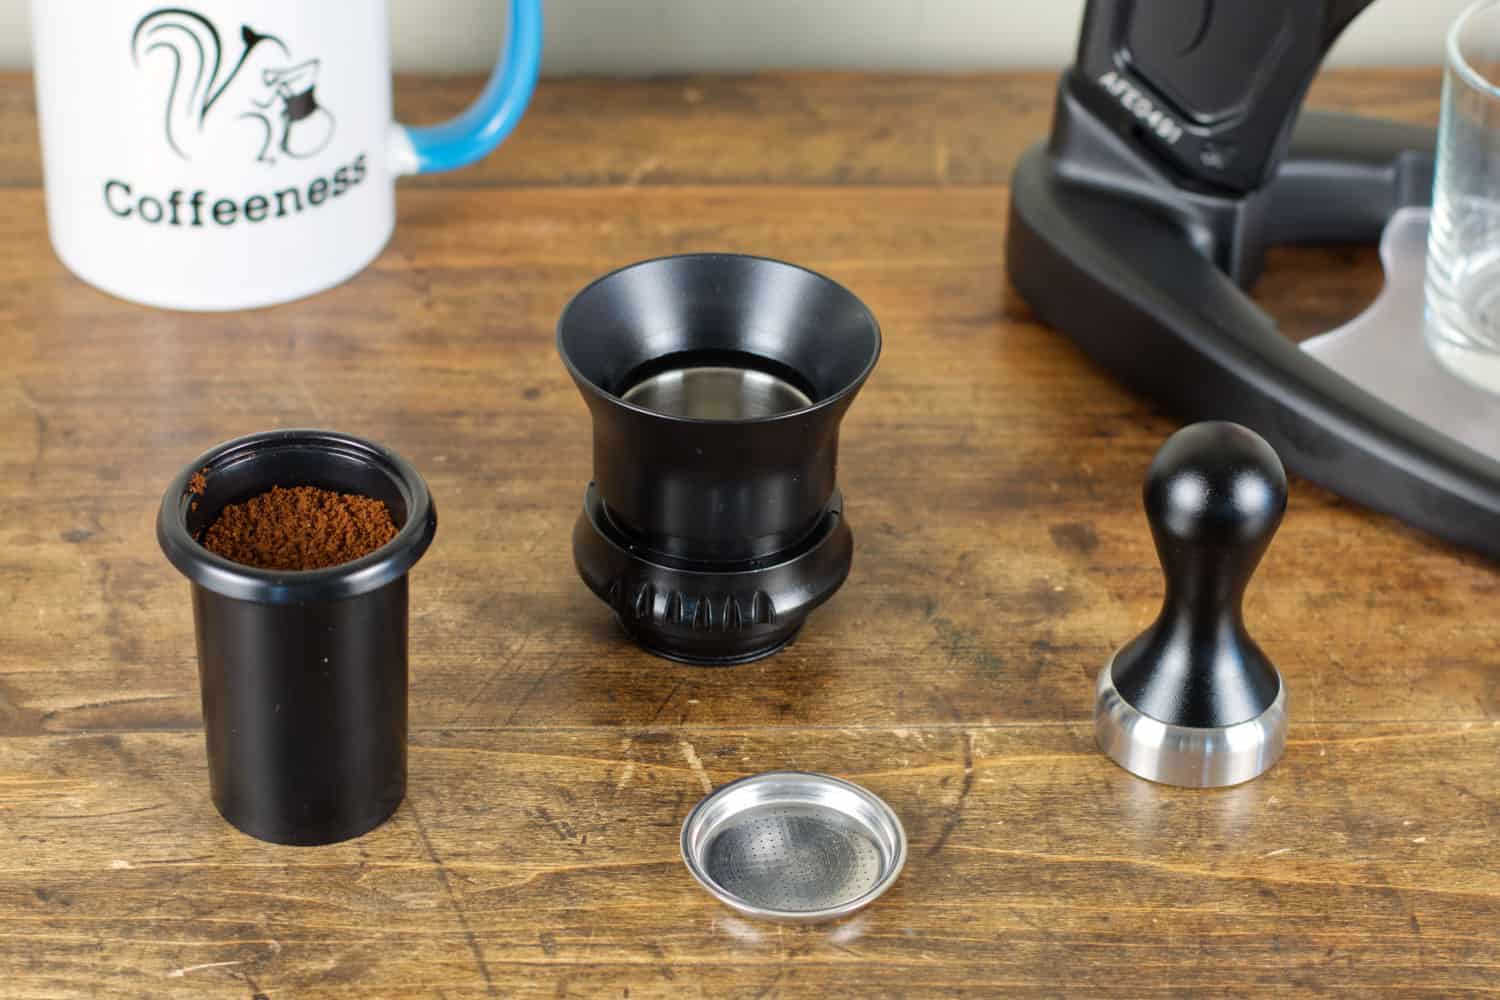
If you buy the Flair Espresso Maker without the Pressure Kit, you’ll have to tamp using the bottom of the plastic dosing cup. While that might be OK for a while, I’d say you’ll have a hard time achieving consistency over the long run.
The dosing cup is handy to have, and there’s a funnel for transferring coffee grounds to the portafilter. That might sound good in theory, but I had a hard time settling larger doses and ended up spilling coffee everywhere. That said, I hadn’t had my coffee yet!
To be honest, I ended up carefully spooning coffee into the portafilter during my Flair Espresso Maker review. Sure, it got a bit tedious doing it that way, but I felt more comfortable and in control.
Travel Case
I’ll admit I’m a sucker for well-designed packaging, and the Flair box didn’t disappoint. In fact, the high-quality cardboard and pretty line drawings reminded me of the beautiful box the Ratio Six Coffee Maker came in. I guess some companies are just good at seducing coffee nerds through tasteful branding!
Even better than the outer packaging is the Flair travel case you’ll find within. This little suitcase feels extremely premium, and there’s special padding inside to keep the machine safe and secure.
Listen, the Flair Espresso Maker has been designed as a travel-friendly device, and the manufacturer has nailed the portability factor. Still, I can only see true espresso aficionados taking this thing on the road. Personally, I’d be more likely to travel with one of the other options in my best portable espresso maker guide.
The Flair Classic Espresso Maker in Use
No matter how experienced you are in the art of espresso, using a manual lever machine for the first time can be daunting. As I already mentioned, getting started with the Flair Classic involved some head scratching and hair pulling.
However, once I’d figured out all the parts and what goes where, actually using the thing wasn’t too hard.
That said, pulling shots with the Flair involves quite a bit of work. In essence, this machine hasn’t been designed to produce shot after shot for all your friends.
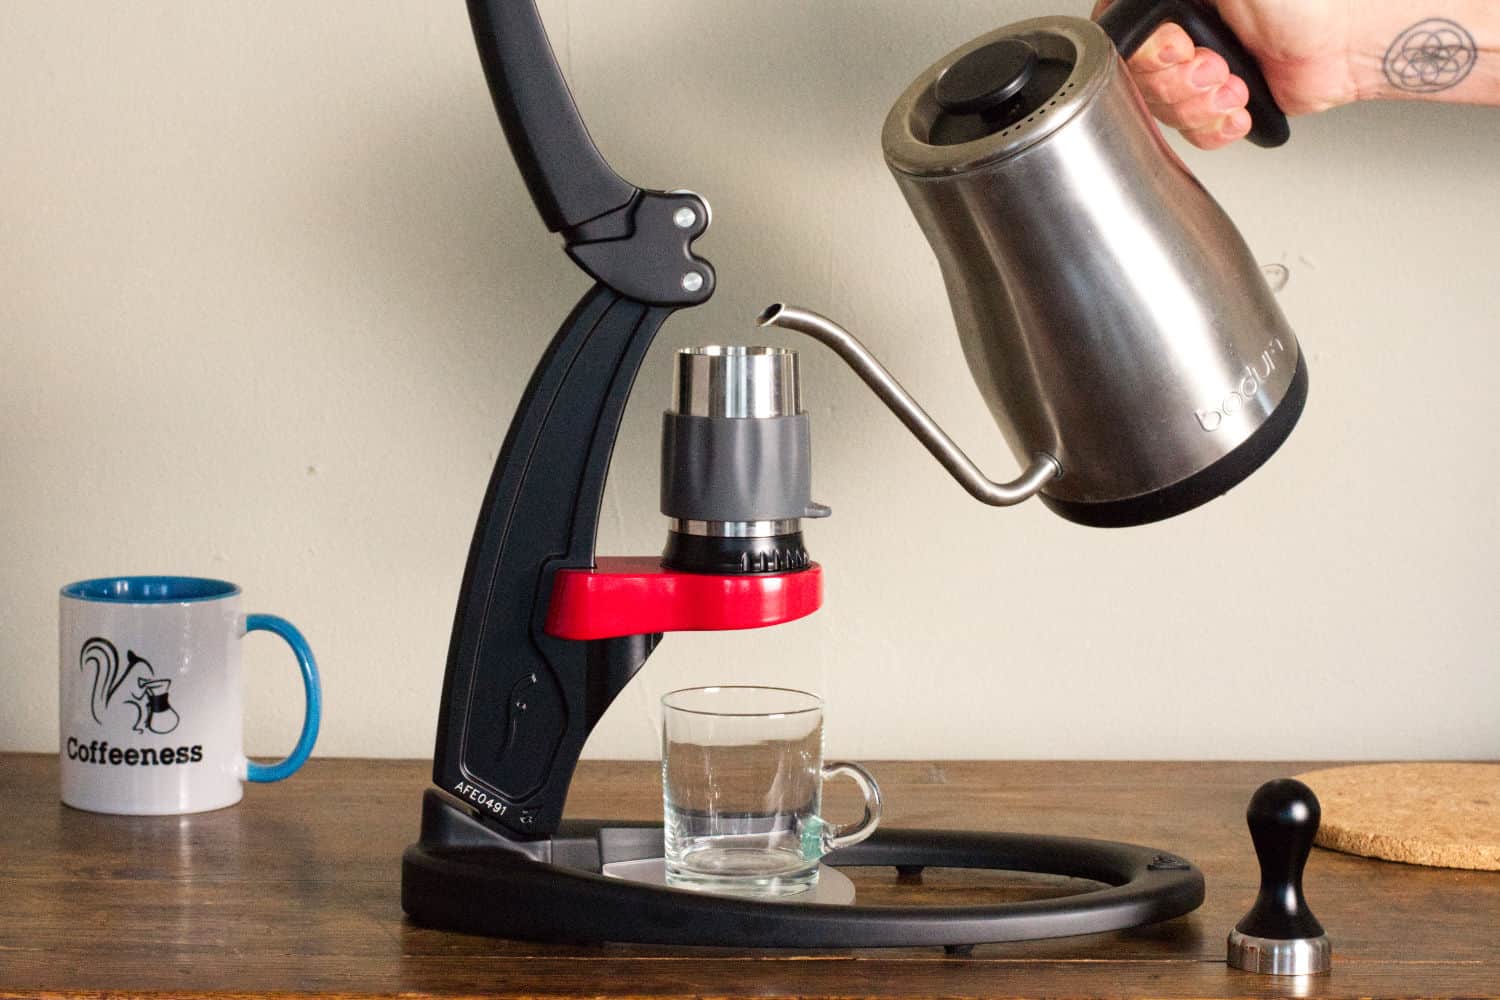
Probably the most inconvenient aspect is having to preheat the brewing cylinder. I used a bowl and submerged the cylinder in water right off the boil. As you might imagine, that resulted in hot fingers, irritating splashes and a few choice curse words each time I retrieved it.
Anyway, you’re going to need a gooseneck kettle, preferably with a temperature hold function. You’ll also need a coffee scale for dosing the portafilter and weighing your shots as they’re extracting. Lastly, don’t forget that all-important burr coffee grinder. Take it from me, using pre-ground coffee is a total no-no with manual espresso makers. I used the Breville Smart Grinder Pro during my testing, and it performed like a champ!
Incidentally, you might recall me referring to the “2-in-1” portafilter. It has a plastic spout attached which will help as you’re dialing in. Once you’re feeling more comfortable, the spout can be removed and you’ve got a bonafide bottomless portafilter!
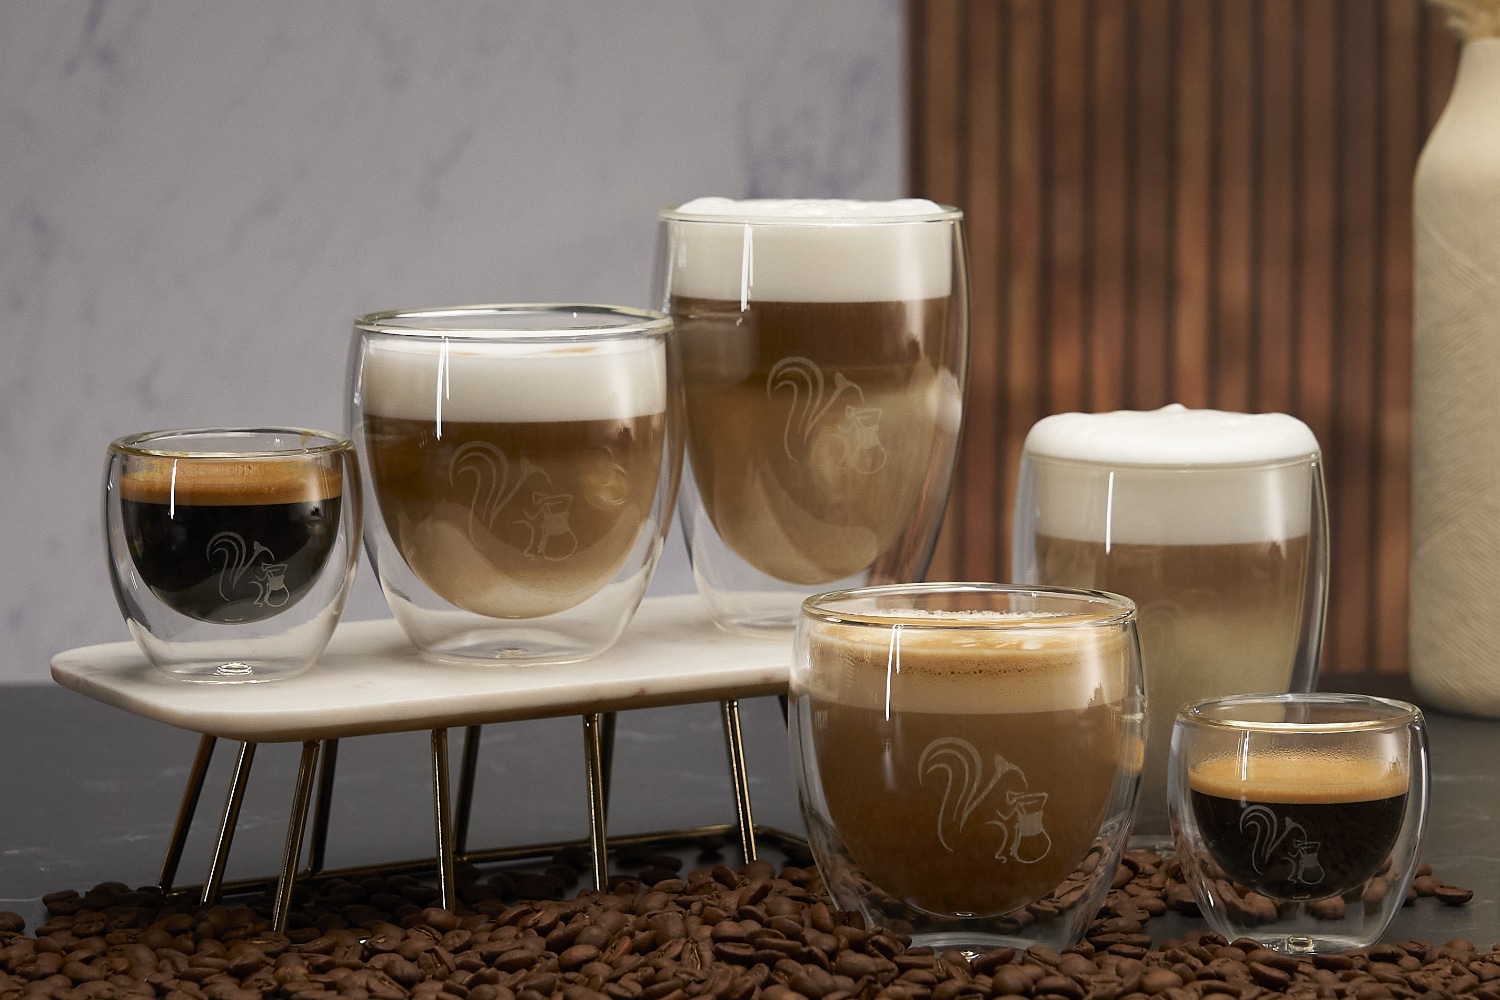
Double Walled Thermo Coffee Glasses
Enjoy your coffee drink hot for longer
Keeps your coffee warm longer
Made of robust borosilicate glass
How to pull a shot with the Flair Classic
Ultimately, success with the Flair involves dialing in not just your grind size and dose, but also your muscle memory.
Your ideal grind size and dose will depend on the coffee beans you’re using. Plus, your preferred yield will vary. Still, for the purposes of this Flair Espresso Maker review, here’s a quick overview of how to pull a shot of high-quality espresso:
Set water to boil, then grind freshly roasted, high-quality coffee beans.
Add your preferred dose of ground coffee to the portafilter, then tamp down firmly with 30 pounds of pressure.
Place the portafilter into its holder on the post of the Flair, then pop the shower screen on top.
Next, preheat the brew head with the pressure gauge plunger inside, then affix firmly to the portafilter.
Pour water into the brew head, being careful not to go above the etched fill line.
Now it’s time to place the piston on top and begin brewing. Gently pull the lever downward to start pre-infusion, then use more force after a few seconds. The pressure gauge will really help during this stage.
Your extraction should take between 35-45 seconds, yielding between 1-1.5 ounces (30-44 milliliters) of espresso. If all went well, the gauge should have registered between 6 and 9 bars of pressure.
How Does Espresso From the Flair Classic Taste?
During my testing, I found that a dose of 15 grams of finely ground coffee was ideal. At least that worked best for the single origin Ethiopian coffee I was using. Featuring a relatively light roast profile, this washed Yirgacheffe displays notes of jasmine, lemon peel and dark chocolate. And in my experience, it excels when prepared as espresso.
As I already said, the shots I was pulling by the end of my review were astonishingly sweet, complex and well-balanced. The machine did a stellar job of highlighting everything I love about the coffee beans I was using. Best of all, the crema was thick, dark and aromatic.
I had a great time experimenting with pre-infusion times, and quickly found the sweet spot. However, I will say that achieving “espresso zone” pressure required more exertion than you might expect. Again, it’s that whole muscle memory thing – once you’ve pulled a few shots you’ll have learned how much pressure to exert.
Incidentally, you’ll notice that I recommended looking for a ristretto shot with an extraction time of up to 45 seconds. Now, that would be way too long for a semi-automatic machine. However, with a manual espresso maker like the Flair Classic, you’re able to fully control the flow rate and pressure, so a longer extraction time can result in a really complex shot.
Flair Espresso Maker Cleaning
I’m happy to tell you that this section won’t be very long. I mean, there’s so little to take care of that it’s laughable. After brewing espresso, simply remove the brewing cylinder, take it apart and rinse everything under running water. Boom! That’s all there is to do.
I can’t discuss descaling because you don’t need to worry about it.
The only other thing I can think of is the shower screen and portafilter, which might get blocked here and there. Still, a pin will take care of any coffee grounds that get stuck in the little holes.
Verdict: Flair Espresso Maker Review
Makes sublime espresso
Flair Classic Espresso Maker
Time and patience required
Affordable espresso machine
Can produce exceptional results
Clever design
Lightweight and portable
Great fun for espresso nerds!
Steep learning curve
Lots of small parts
| Flair Classic Espresso Maker | |
| Manufacturer | Flair Espresso |
|---|---|
| Model number | Classic |
| Product category | Manual espresso machine |
| Housing material | Stainless steel with plastic parts |
| Color options | Black |
| Milk frother | None |
| User interface | None |
| App | |
| User profiles | Memo function only |
| Portafilter size | 40 mm |
| Tamping | Manual |
| Removable water reservoir | |
| Water reservoir capacity | N/A |
| Number of boilers | 1 |
| Pump pressure | 9 bar |
| Maximum cup height | 5.0 in / 12.7 cm |
| Grinder | N/A |
| Grind adjustment levels | N/A |
| Bean hopper capacity | N/A |
| Specialty drinks | 0 |
| Pre-infusion | |
| Adjustable coffee temperature | |
| Adjustable milk foam temperature | |
| 2-cup function | No |
| Hot water function | |
| Hot milk function | |
| Milk foam only option | |
| Water filter | |
| Power consumption | N/A |
| Weight | 5.0 lb / 2.3 kg |
| Dimensions | 10.0 x 6.0 x 12.0 in |
| Warranty | 5 years |
| Notes | Included Accessories: User manual, Bottomless portafilter, Dosing cup/tamper, Carrying case. Optional Upgrades: Pressure kit with gauge and stainless steel tamper. |
| Current price on Amazon | BUY NOW ON AMAZON |
| All specifications | |
Maybe I was being a bit dramatic at the start of this Flair Espresso Maker review. But like I said, I hadn’t had my morning coffee before starting to try and use the thing.
Still, the Flair Classic requires full commitment on the part of the user, both in terms of assembly and espresso preparation. There’s a lot to deal with, a lot to learn and plenty that can go wrong. And that’s as much the case for experienced baristas as it is for espresso novices.
With all that said, those willing to put in the time and energy will be richly rewarded. Trust me, I’m still thinking about the delicious shots I pulled. It’s just that when I woke up this morning, I couldn’t face the thought of all the hoops I’d have to jump through to taste that great espresso again.
So, at the end of the day I think of the Flair Classic as a fun toy to pull out every once in a while. But I’ll still be traveling with an AeroPress stuffed into my backpack!
Flair Espresso Maker FAQ
Thanks to its innovative design, the Flair is more than capable of producing true espresso.
The Flair Classic is constructed using high-quality aluminum and stainless steel. Although there are some plastic parts, they’re kept to a minimum.
Ideally, the duration of an espresso extraction will be between 30 and 45 seconds when using the Flair.
The ideal dose for the Flair Classic Espresso Maker is between 12 and 16 grams.